In this article, you will learn how to install LAMP on Ubuntu 22.04. Before installing LAMP on Ubuntu 22.04, do we know what is LAMP? A “LAMP” stack is a pack of open-source software that we can typically install jointly. In order to allow a server to host dynamic websites. So, the web apps are written in PHP. This term is an acronym that signifies the Linux functioning system with the Apache webserver. A MySQL database stores the site data. And, dynamic content is processed by PHP.
We can break the term “LAMP” into 4 terms:
- L – Linux Operating System.
- A – Apache, An HTTP, and proxy server.
- M – MySQL or MariaDB relational database management system
- P – PHP programming language.
Now, we will start to learn how to install LAMP on Ubuntu Desktop 22.04.
Step # 1: How to install Apache and Update the Firewall? Install LAMP on Ubuntu.
The Apache web server belongs to the most famous web server in the world. It’s well documented and has an active fan following of users. And, has been in wide use for most of the history of the web. So, it produces a great alternative for hosting a website. Let’s start by updating the package manager cache.
First of all, you press the 3 buttons CTRL + ALT + T on your keyboard to open the terminal to give commands to Ubuntu. You can open the terminal by searching in your app list in the Ubuntu sidebar’s 9 squares icon. If you are using sudo first time in this session then you should provide the password to confirm that you really wanted the changes in the system packages with apt:
$ sudo apt update
Then, install Apache with this command in your terminal:
$ sudo apt install apache2
The next screen will ask you to confirm Apache’s installation. Confirm installation by hitting the button Y and then ENTER.
So, once the installation is completed. You will need to modify your firewall settings to authorize HTTP traffic. The name of Ubuntu’s default firewall setup mechanism is Uncomplicated Firewall (UFW). It has various application shapes that you can leverage. So, to list all presently available UFW application profiles, execute the command shown below.
$ sudo ufw app list
The output you will get:
Available applications:
- 1. Apache
- 2. Apache Full
- 3. Apache Secure
- OpenSSH
The each of profiles means:
- 1. Apache: The Apache profile opens only port 80 ( regular, unsecured web traffic ).
- 2. Apache Full: The Apache Full profile opens both port 80 ( regular, unsecured web traffic ) and port 443 ( TLS/SSL secured traffic ).
- 3. Apache Secure: The Apache Secure profile opens only port 443 ( TLS/SSL secured traffic ).
For now, it’s most suitable to permit only relations on port 80. Since this is a refreshed Apache installation and you don’t yet have a TLS/SSL certificate structured to permit HTTPS traffic on your server.
To only permit traffic on port 80, use the Apache profile:
$ sudo ufw allow in “Apache”
Verify the change with:
$ sudo ufw status
The output You will get:
Output
Status: active

To                         Action      From
--                         ------      ----
OpenSSH                    ALLOW       Anywhere
Apache                     ALLOW       Anywhere
OpenSSH (v6)               ALLOW       Anywhere (v6)
Apache (v6)                ALLOW       Anywhere (v6)
The traffic on port 80 is now authorized via the firewall.
You can do a spot examination right away to verify that everything went as arranged by visiting your server’s public IP address in your web browser. So, if you are installing on your localhost, you can use this command line or IP address on your browser’s search bar:
localhost
or
127.0.0.1
Now, after using the above command you will see the default Ubuntu Desktop 22.04 Apache web page given below. This page is for information and testing purposes.
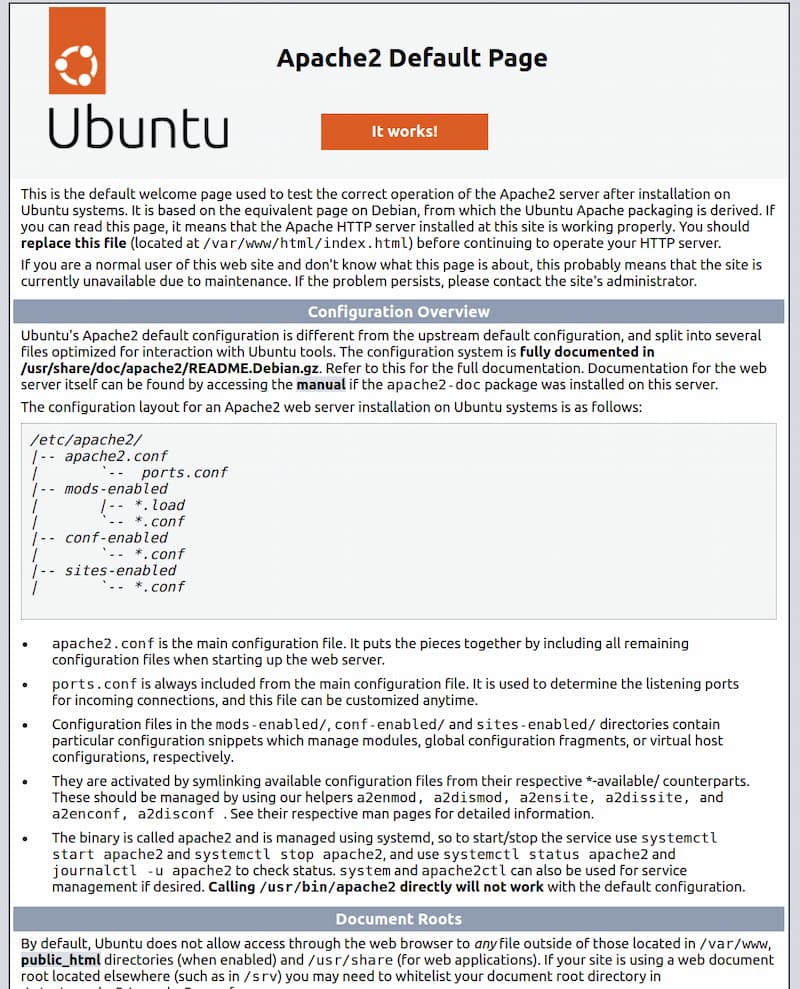
If you can see the above page given in the image then your web server is installed correctly. Also, this web server is attainable via your firewall.
How to find your Server’s Public IP Address?
If you are installing LAMP on localhost then you can find your Server’s Public IP Address from this method. Find Public IP Address.
Step # 2: How to Install MySQL on Ubuntu 22.04? Install LAMP on Ubuntu.
Now, that you have a web server up and operating. So, you need to install the database plan to be able to store and collect data for your website. MySQL is a popular database command system used within PHP circumstances. Again, use apt to develop and install this software:
$ sudo apt install mysql-server
When prompted, confirm installation by typing Y, and then ENTER. When the installation is finished, it is recommended that you execute a safety script that arrives pre-installed with MySQL. This script will remove some encrypted default settings. And, lockdown entrance to your database system. So, start the interactive script by running the command given below:
$ sudo mysql_secure_installation
The next section will ask you to configure the VALIDATE PASSWORD PLUGIN. Answer Y for yes, or anything else to continue without allowing. Note that you are to install LAMP on Ubuntu Desktop 22.04.
VALIDATE PASSWORD PLUGIN can be used to test passwords
and improve security. It checks the strength of password
and permits the users to set only those passwords which are secure enough. Would you like to setup VALIDATE PASSWORD plugin?

Press y|Y for Yes, any other key for No:
If you answer “yes”, the next section will request you to choose a status of password validation. Keep in mind that if you select 2 for the strongest status, you will get errors when you attempt to set any password which doesn’t have numbers, upper and lowercase letters, and special characters:
There are three status of password validation policy:

LOW    Length >= 8
MEDIUM Length >= 8, numeric, mixed case, and special characters
STRONG Length >= 8, numeric, mixed case, special characters and dictionary              file

Please enter 0 = LOW, 1 = MEDIUM and 2 = STRONG: 1
What happens when you choose to set up the VALIDATE PASSWORD PLUGIN?
In case, you choose to set up the VALIDATE PASSWORD PLUGIN, your server will ask you to pick and confirm a password for the MySQL root user. The database root user is an administrative user with full ownership over the database system. So, if you enabled password validation, you will see the password strength for the root password you just entered. And, your server will ask if you like to continue with that password. If you are satisfied with your current password, then enter Y for “Yes”.
Estimated strength of the password: 100
Do you wish to continue with the password provided?(Press y|Y for Yes, any other key for No) : Y
For the remaining questions, press Y and hit the ENTER key at each query or question. This will remove some unidentified users and the test database, and disable remote root logins. And, load these new rules so that MySQL instantly respects the changes you have made.
When you complete your installation, test whether you are able to log in to the MySQL console by giving the command:
$ sudo mysql
This will combine with the MySQl server as the administrative database user root. That is figured by the use of sudo when executing this command. Below is an example outcome:
The output you will get:
Output
Welcome to the MySQL monitor.  Commands end with ; or \g.
Your MySQL connection id is 10
Server version: 8.0.28-0ubuntu4 (Ubuntu)

Copyright (c) 2000, 2022, Oracle and/or its affiliates.

Oracle is a registered trademark of Oracle Corporation and/or its
affiliates. Other names may be trademarks of their respective
owners.

Type 'help;' or '\h' for help. Type '\c' to clear the current input statement.

mysql>
To exit the MySQL console, type the following command:
$ sudo mysql> exit
Notice that you did not require to provide a password to attach as the root user. And, this is the middle part of installing LAMP on the Ubuntu guide. Even though you define one when running the mysql_secure_installation script. So, that is because the default authentication procedure for the executive MySQL user is unix_socket instead of a password. For increased security, it is best to have separate user accounts with less expensive ownership set up for every database. Also, the previous method is best especially if you plan on having multiple databases on your server.
So, your MySQL server is installed and encrypted. The next step of install LAMP on Ubuntu is to install PHP. It is the final part of the LAMP stack.
Step # 3: How to Install PHP – The Final part of Install LAMP on Ubuntu?
You installed Apache in Step # 1 to server your content or data. And, you installed MySQL to keep safe and handle your content and data. So, the PHP is the last part of ou setup that how to install LAMP on Ubuntu 22.04. So, this part will process code to display dynamic data to the final user. In expansion to the PHP package, you will need php-mysql. php-mysql is a PHP module that authorizes PHP to communicate with MySQL-based databases. So, you will also need libapache2-mod-php to enable Apache to manage PHP files. Core PHP packages will automatically be installed as dependencies.
To install these packages, run the following command line:
$ sudo apt install PHP libapache2-mod-php PHP-mysql
If you have installed PHP from the above command, then run the following command line to verify your PHP version:
$ php -v
Output
PHP 8.1.2 (cli) (built: Mar  4 2022 18:13:46) (NTS)
Copyright (c) The PHP Group
Zend Engine v4.1.2, Copyright (c) Zend Technologies with Zend OPcache v8.1.2, Copyright (c), by Zend Technologies
At last, your LAMP stack is fully functional and in the working stage. So, congratulations on installing LAMP on Ubuntu 22.04. If you have any questions about the LAMP stack, comment below without any hesitation. Thank You.